|
Preface
MDOC has from version 14.0.1.0 (Mdoc 2012 sp.1) implementing “Ribbon user interface”. Ribbon user interface is implemented in a way that allows MDOC to run both classic mode and the new Ribbon interface mode. This is made to give users the opportunity to continue running classic MDOC. In other ways, users do not have to struggle with a new user interface. The classic user interface has no changes compared to Mdoc 14.0.0.0
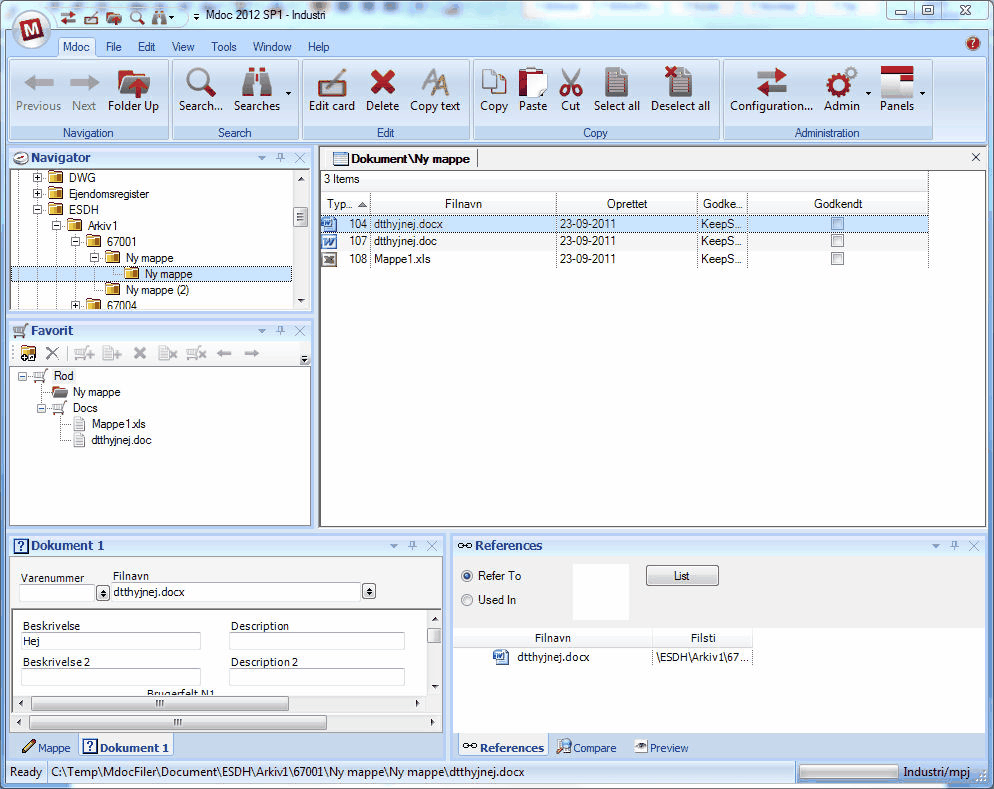
MDOC ribbon user interface looks like this
MDOC Ribbon user interface is configurable with all the functions that need to be on each ribbon tab. Furthermore is the System menu, quick access toolbar and partly the right clicks menu, user specific configurable.
MDOC Ribbon gives a great picture of the functions available. Even the fact that Ribbon uses large icons, still gives the user possibility to “auto hide” the ribbon to preserve the work space.
Start MDOC ribbon
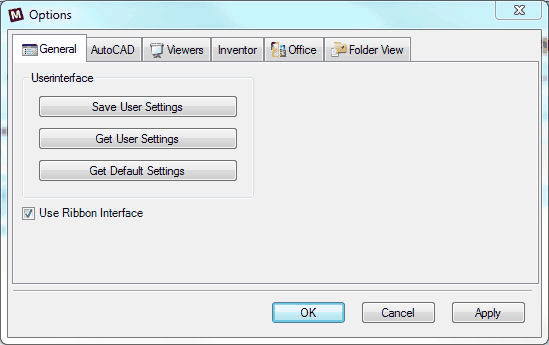
MDOC Ribbon is started by check mark the”Use Ribbon User Interface” in the MDOC Settings interface
MDOC need restart after the check mark of “Use Ribbon User Interface” to show MDOC with the Ribbon Layout.
First start
The first time MDOC ribbon is started, the standard ribbon settings-file delivered with MDOC is used.
MDOC Ribbon standard settings-file is installed automatically with the installation of MDOC. The file is found in MDOC installation folder and called”MdocRibbon.MdocRibbon”. There are also language dependent MdocRibbon standard settings files, these are called MdocRibbon.<Language Code>.MdocRibbon. For instance is the name of the Danish file MdocRibbon.da-DK.MdocRibbon, and the English American file MdocRibbon.en-US.MdocRibbon.
After MDOC has been started the first time with Ribbon user interface, the database language specific settings file is used called <database name>.<Language Code>.MdocRibbon. This file is found in folder %AppData%\NTI CADcenter\Mdoc 2012\14.0. During the first start up with Ribbon, the standard settings file is copied to the specific settings file.
In the database specific settings-file, everything regarding the setup of Ribbon on this client is saved.
Please note that the default standard file” MdocRibbon.MdocRibbon” is copied, if the correct language dependent is not found in MDOC installation folder.
Please note when language is changing a new language dependent settings file is copied , if the language never has been selected before. For instance, if Danish is selected for the first time, and English was the selected language.
Then the file <Database Name>.da-DK.MdocRibbon is not found in the folder %AppData%\NTI CADcenter\Mdoc 2012\14.0. Therefore the file MdocRibbon.da-DK.MdocRibbon from the MDOC installation folder, is copied to %AppData%\NTI CADcenter\Mdoc 2012\14.0\<Database Navn>.da-DK.MdocRibbon.
Ribbon functions
Ribbon is a way to make graphic menus in a windows application. The menu items is in principle able to contain all kind of controls that can be used for settings commands etc. In MDOC this is limited to pure commands
MDOC Ribbon has 3 main parts, The Ribbon itself, The Office menu and the Quick start toolbar.
The Ribbon
The Ribbon is a row of menu tabs that contains a number of groups (called toolstrips). Toolstrips is again containing commands or split buttons.

The Ribbon itself is this part of the user interface
The Ribbon can be minimized, to only to be shown when a tab is clicked. To minimize Ribbon, hit the button ”Customize quick access toolbar”, and chose the menu point ”Minimize the Ribbon”.
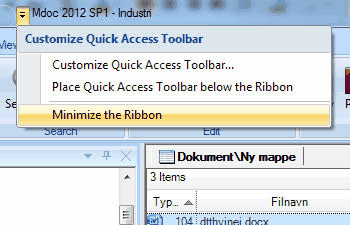
Minimize the Ribbon
When”Minimize the Ribbon” is chosen, a large MDOC workspace is possible at the same as using the large Ribbon Icons
Buttons and split buttons
MDOC Ribbon is able to contain buttons and split buttons. A button is a well known MDOC command. A split button is a collection of buttons or split buttons that shows up when the split button is clicked.
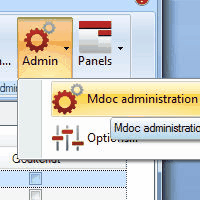
An Example of a split button
Office menu
The Office menu is activated by clicking the MDOC button in upper left corner
.
In the Office menu a number of MDOC command buttons is located. Furthermore is a command button for access to the Ribbon settings interface located here and a button to exit MDOC.
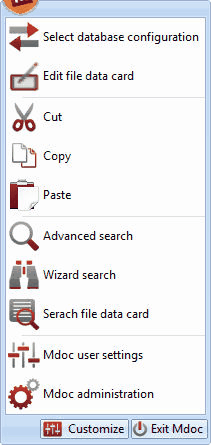
Office menu example, please note the” Customize” and “Exit MDOC” buttons at the bottom
The Office menu is not able to contain split buttons at the moment.
Quick access toolbar
The Quick access toolbar is the toolbar shown in MDOC title bar

Quick access toolbar looks like this, as a starting point
The Quick access toolbar is exclusively containing links to “command buttons”, “split buttons” or “Ribbon toolstrips”. The Quick access toolbar can be placed below the Ribbon. To do this; activate the” Customize quick access toolbar” and chose” Place Quick Access toolbar below the Ribbon”.
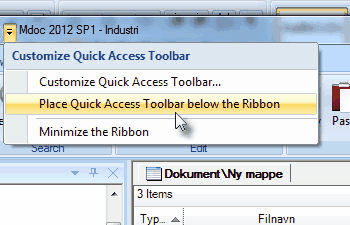
Placing the Quick access toolbar below the Ribbon

Quick access toolbar, placed below the Ribbon
Setup of the Ribbon
MDOC ribbon can be configured with pictures and text. All commands can be added and removed, and reorganized. This also goes for Office menu and Quick access toolbar.
The Ribbon setup dialog is accessed by pressing the button “MDOC Setup” at the bottom of the Office menu
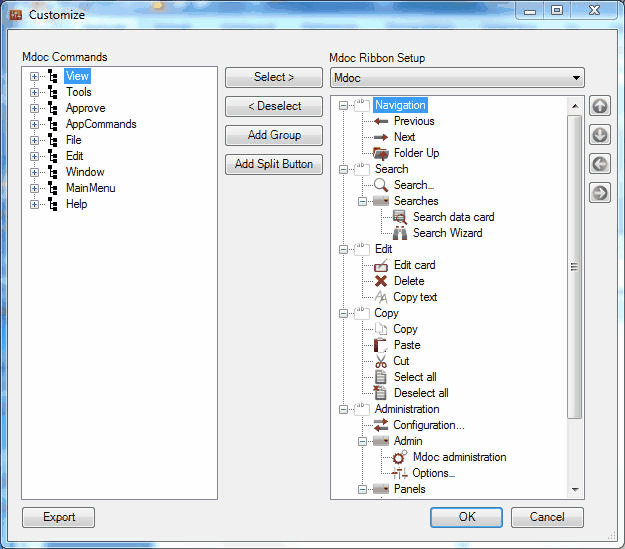
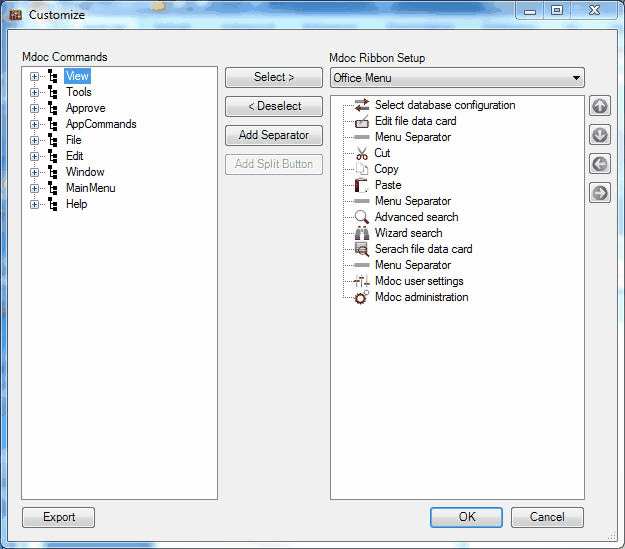
The MDOC Ribbon setup dialog
The MDOC Ribbon setup dialog contains 2 tree panels. The left tree panel is called “MDOC Commands”. This panel contains all accessible MDOC commands. The right tree panel is called “MDOC Ribbon Setup”. This panel contains all the Ribbon tabs setup. In the dropdown box above the right panel selects which tab is shown in the tree panel.
Edit the setup
One tab is build by toolstrips (groups) in the root. Toolstrips is adde solely by pressing the button “Add Group”
Button is added by selecting the MDOC command in the left panel and press” Select >”. Buttons is inserted belov the selected element in the right panel. Buttons can also be added by dragging elements from the left panel to the right (Drag Drop with the mouse).
Reorganizing of buttons in the right panel is done by using the arrow buttons located to the right of the right panel, or simply done by dragging the elements around (Drag Drop with the mouse).
Buttons can solely be removed from the right panel by marking the button(s) and pressing “< Deselect”.
Pressing the ”Add Split Button”, adds a split button to the right panel.
Texts, pictures and tooltips
It is possible to configure each button with button text, picture and tooltip. This is done by double clicking or by pressing”F2” on the selected setup item in the right panel.
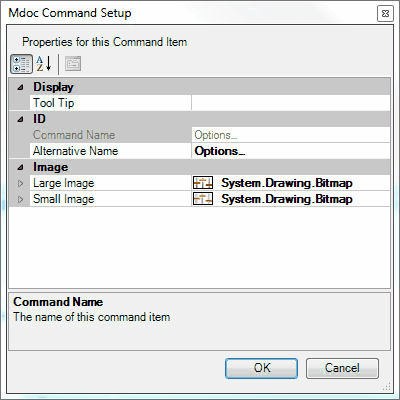
Properties for a single setup item
The size of the large pictures is recomended to 32*32 pixels. Other sizes can be used but MDOC Ribbon is formatted to fit the 32*32 pixels pictures. The size of the small pictures is always 16*16 pixels. MDOC is automatically scaling the small picture if it has another format.
It is recommended use png picture files. This standard contains possibility for having transparent areas and still has a fairly compressed file
“Command Name is the internal name for the MDOC Command, this value is not editable. “Alternative name” is the text used on the button, split button and toolstrip.
Text written in tooltip, is used in MDOC to show helping text when pane the Mouse over the command button.
Setup of the Office menu
The Office menu can be set up, if the” Office menu” point is selected in the dropdown box over the right panel in “Customize” dialog. The button Add Group is changed to “Add Separator” and “Add Split Button” becomes inactive. In the Office menu items can only be added to the root node.
In the Office menu, menu separators can be added. A menu separator is a line that is used in menus to group related items.
Customize the Office menu
Setup of the right click popup menu
Chose “Popup Menu” in the dropdown box over right panel in the customize dialog, this give possibility to setup listwindows right click menu. This setup is similar to “Office menu” setup.
I is solely adding elements to the right click popup menu. Most of the menu elements are defined in modules other places in MDOC.
The right click popup menu is not a part of ribbon. But the adding of elements belongs here, because there is no other possibility to setup this menu.
Setup of the Quick launch toolbar
The Quick launch toolbar has an eksklusive setup dialog. This is because Quick launch toolbar solely contains buttons, split button and ribbon toolstrips, which is pre configured in MDOC ribbon. So Quick launch Items is links to defined ribbon elements.
Quicklaunch toolbar setup dialog is accessed by using the menu point” Customize quick access toolbar” and chose” Customize Quick Access Toolbar…”
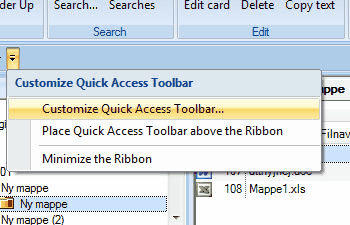
Quick launch toolbar setup dialog is accessed this way.
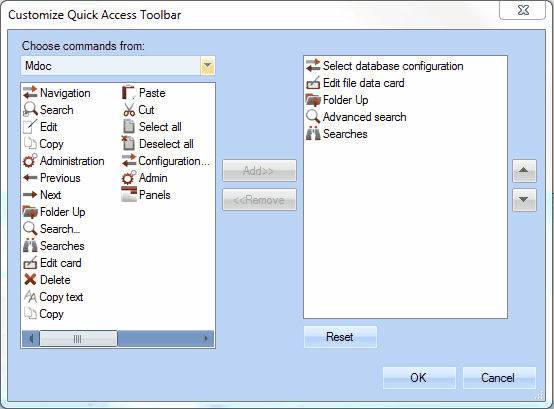
The Quick launch toolbar setup dialog looks like this.
This dialog is almost working exactly like the MDOC Ribbon setup dialog
Export of a merge file
MDOC Ribbon has the ability to export a read a merge file. A merge file updates the ribbon setup, without ruining the single user’s unique setup.
The practical use of this, is when new functionality is added to MDOC. E.g. approval procedures, “Add Card Wizards” or a new module. The new buttons is placed in a merge file, that is distributed to all the affected clients. When the MDOC client is started next time, the buttons is added to the local setup file, without affecting the rest of the setup.
Export function is accesed by pressing the button”Export in the Customize dialog. The selected elements is the ones that is exported.
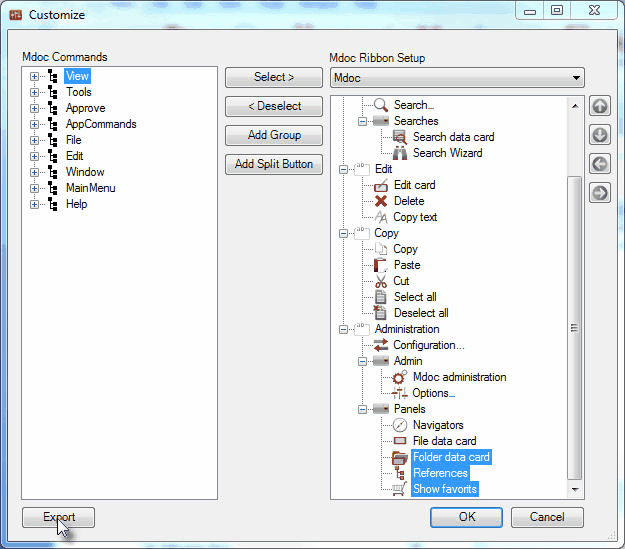
3 selected elements is ready for export.
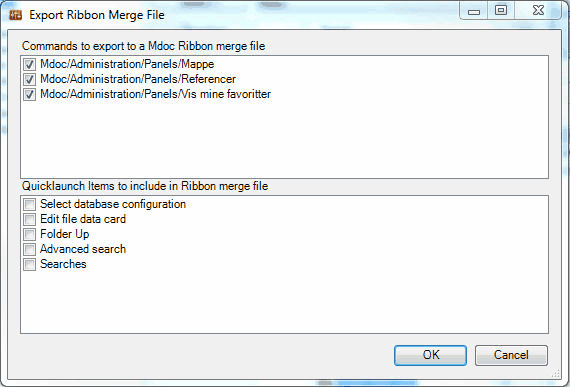
The 3 selected elements, shown in the upper list
All elements can be exported, buttons, split buttons, separators and ribbon groups. If a split button or a ribbon groups is selected, all sub buttons etc is automatic exported too. If a checkmark is removed from a element this element is not becoming a part of the merge file.
It is possible to include Quick launch elements in the merge file. This is done by check marking the quick launch elements in the lower list, that is wanted in the merge file.
When OK button is hit, the program will ask for filename of the type ”MdocRibbonMerge”. The exported file is containing both pictures and text.
Read and placement
Merge files must be placed in the MDOC root folder on each client, to become redden next time MDOC is executed. Distribution of the merge files may be done by the MDOC update module.
Merge files is only redden once, afterwards they are ignored.
Merge files can be language dependent. This means that they only update certain language specific settings files. This is done by adding language code to the file name this way <merge file name>.<Language Code>.MdocRibbonMerge.
For instance could a merge file be named” Update.da-DK.MdocRibbonMerge”. This file will then solely update <database name>.da-DK.MdocRibbon settings files.
Merge files that do not have a language code, updates all settings files.
Advanced MDOC Ribbon
The is a MDOC ribbon file for each single MDOC database. Each user on the client machine, has their own set of setup files. The settings file for MDOC Ribbon is called” <databasename><Language Code>.MdocRibbon”. If the MDOC database is called “Industri”, started with Danish language, the Ribbon settings file is called “Industri.da-DK.MdocRibbon”.
The Ribbon setup file is placed in the folder%appdata%\ NTI CADcenter\Mdoc 2012\14.0. MDOC need to be able to read and write in that folder.
MDOC Ribbon setup file is a zip archive and is able to open in Winzip or another file compressing tool.

MDOC Ribbon setup file opened in Winzip
The zip archive contains a file called RibbonSetup.xml. This xml file contains all information about the setting up of MDOC Ribbon user interface.
Furthermore the MDOC Ribbon setup file contains two folders, ”LargeImages” and ”SmallImages”. Each containing large and small pictures, that is used in MDOC Ribbon. Pictures are identified by their internal command name in MDOC. A picture for split buttons and Ribbon groups is identified by a GUID code.
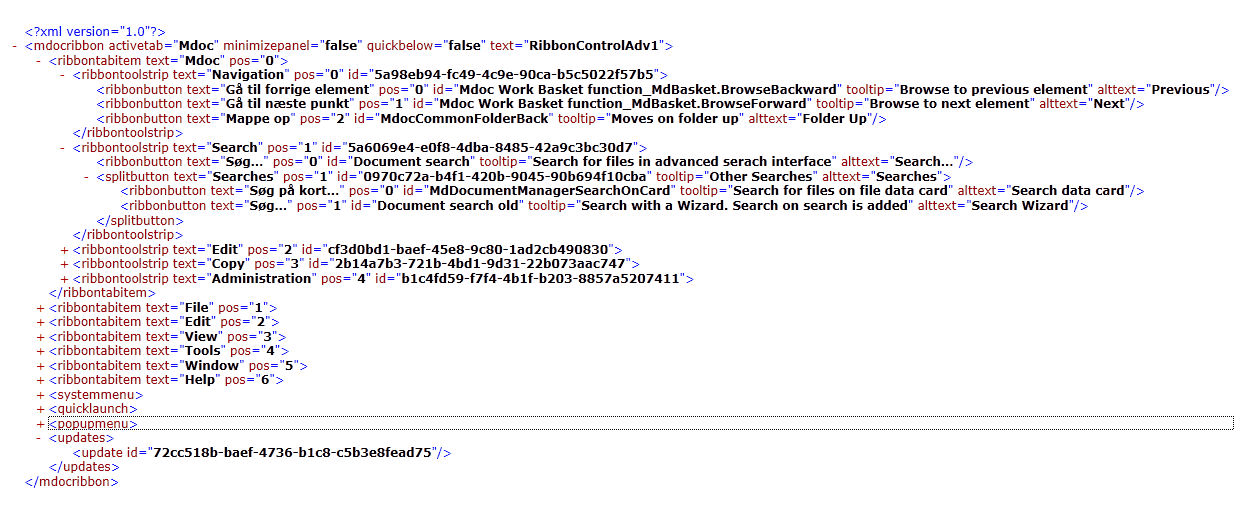
MDOC Ribbon xml setup file is opened in Internet Explorer
The XML-file is having a structure as shown above. It consist of a number of tab-items, which in turn consists of some toolstrips (Ribbon Groups). In these Ribbon groups buttons and split buttons is located. System(Office) menu, quick launch and popup menu’s only contains one level.
Furthermore is a number of update keys, that identifies the merge files that has been added to this Ribbon setup file.
The customize dialog is not implementing possibility for adding tabs. For this, for example a company tab or a tab to group special features. Open the the xml-file in Notepad and copy a ribbontabitem node and give it a new text. It is important to underline that the text attribute value must be unique. It is not allowed to have 2 tabs with the same text. Another important point is, that the person that make changes to the xml file is skilled for xml operations.
Advanced Ribbon merge
The MdocRibbonMerge file is a zip archive and looks exactly like the Ribbon setup file. The only difference is the “RibbonSetup.xml” that is a bit different.
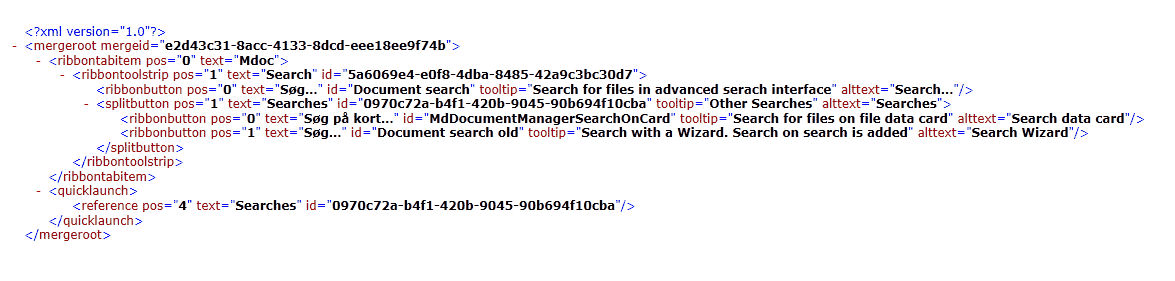
An example on a MDOC Ribbon merge file
The XML file has a root node called <mergeroot>, where the setup file has a root called <mdocribbon>
Please note that all merge nodes has their own section, from root to merge element.
The merge function investigates if the tab, Ribbon group, split button or button is located in the setup before it is added. If the element is not located in the Ribbon setup, MDOC is trying to add the element on the position stated in the “pos” attribute.
The merge function is ofcause able to add a new tab to all client machines if that is needed. Please look at the Advanced MDOC Ribbon section to see how.
Please note that quick launch elements only will function if they are links to existing MDOC Ribbon elements.
|